Renovations - part two
Those of you who saw part one of the renovation series will hopefully now have a good idea of the 'before' look of this amazing building in Moseley Village which is having the transformation of its life as it turns into my new haberdashery, fabric and yarn shop.
If your local to the area then you might have noticed that things have started to happen over the last few weeks. Its been 6 years since anything substantial was done to the building so its super exciting to finally get things underway!
Before we get down to some serious building and renovation we've had to strip everything back. It's a long hard job and I've been feeling a bit overwhelmed at times but you have to just keep chipping away at these things.
To give a bit of context to the building...what you see from the main road only really shows a small bit of the building. Three extensions have been built over the years. The first one was built fairly near the time the original building was erected in 1898 and was a two story wing which made the building a bit like an L shape. The next one, probably built in the 50's or 60's filled that gap in the L shape and the third one extended the whole building straight back. So from the front of the bay window the building extends back about 30 meters.
The council have granted permission to get rid of the extensions and renovate the original building, of course preserving the original features and characters of the building. Then behind the original building we are building a new house for ourselves. From the main road though....it will look pretty much the same as it does now...just obviously not as tatty!
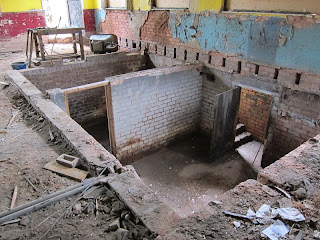
So far the floor boards have now been partly lifted off to expose our cellars. The people who built the extensions must have really liked cellars, there are three big rooms down there!
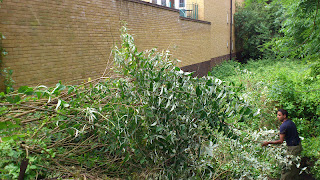
The other area we tackled this week was the back garden. The garden is...absolutely HUGE! (The building actually only occupies a tiny bit of the entire plot of land) And it was like a jungle! A jungle of 6 years worth of overgrown brambles! We couldn't see the side fence and even now we still haven't made it to the bottom fence.
Some of the bushes weren't too bad to cut through. Me and Ayaz managed that in a few hours with a hedge trimmer.
This is the view before we started. You could literally not get through. The building that you can see on the left hand side of this picture.....our garden finishes just passed that the far end of it!
This is after we had cut through a bit and the bushes on the near left of this photo was what we tackled first.
This was looking back on the slop that leads back up to the house after we had taken down the bushes.
Next was the brambles. We hired a brush cutter machine (like a strimmer but stronger) for the day and really wanting to get our moneys worth I attacked the brambles with the machine.
It was such a tough job! I'm defiantly not cut out to be a labourer. I started working about 8.30am and we finally went home about 6.30pm. The next day was a complete write off. I was so exhausted and my arms were aching like mad! I could hardly grip anything! Never again!
We did manage to chop a lot though. Now we just need to sort out all the piles of chopped up foliage. Plan is to let it wilt down for a few weeks then maybe hire a portable chipper machine to chop it all down.
This is the view now from the back of the house. Not quite the manicured garden I dream of but its a start and at least you can see the ground now!
The other thing we have sorted out this week is the front garden. We took down the wall at the front and carefully put it to the side to rebuilt at a later date. We wanted to level off the garden to allow for easier access...and it was falling down anyway. Unfortunately, the sandstone walls were stolen on Monday (18th June)! It's really disappointing. Such a horrible feeling when someone takes something that it yours!
So now we have put up security fencing with some tarpaulins to make it look a bit neater from the street. Next plan is to get a lovely 'Coming soon' sign made for the front!
More posts

Tutorials
Personalised Liberty Christmas Stocking Tutorial
Laurens guide to making a lovely stocking your family will treasure for years to come!


